22 December 2010

Bathroom library

I saw a cartoon that reminds me very much of my house. In the comic, a woman is giving her friend a tour of the house and as she stops in front of the bathroom she gestures towards it politely and says, "And this is my husband's library."

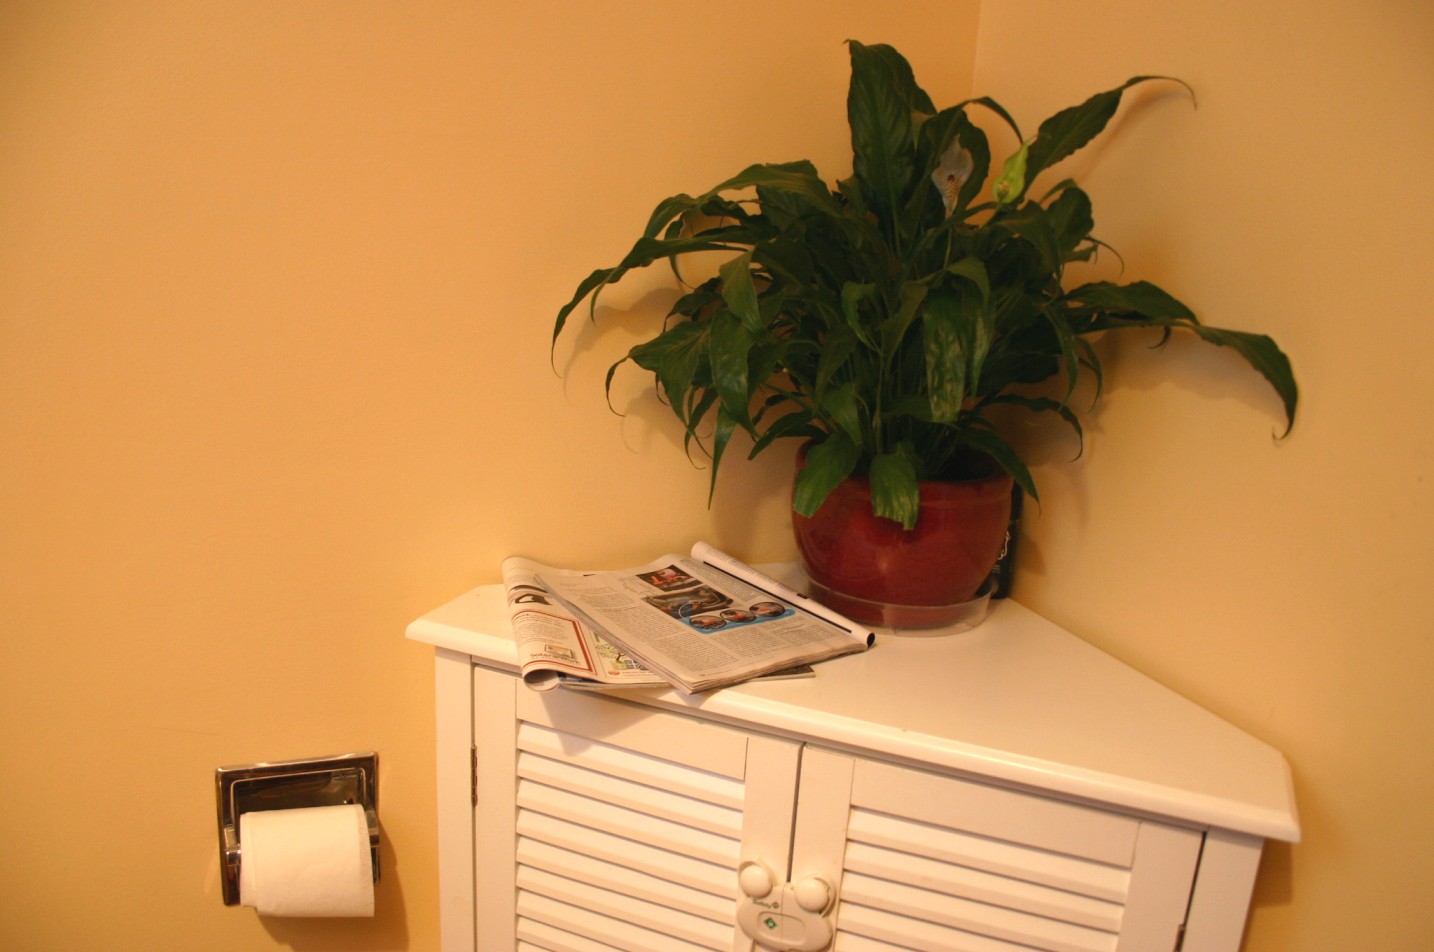
A pile of magazines starts to grow faster than the house plant in the first floor bathroom.

That's how my DH treats our bathrooms and I have to admit, I can understand it. When you have young children, there's pretty much only one room in the entire house where you can truly get some peace and that's the library, aka, bathroom. But, of the three bathrooms in this house, two of them are small and there's no room for a regular magazine rack. This means that I have to pick up piles of Solar Today and Popular Mechanics to clean the bathrooms or shuffle them aside to get to the things that really belong in a bathroom. So I came up with a solution I can live with.

The solution.
I know, you're probably thinking, what's that. It's my solution so the bathroom reader and the bathroom cleaner can coexist peacefully together in the same space. I'll let it speak for itself.


Ta-da! The most elegant solutions are usually the most simple. I transformed some scrap wood into a magazine wall rack. By painting it the same color as the wall (called Sugar cookie by Behr), I hoped to make it blend in as much as possible. I didn't want to clutter an already small bathroom.


What do you think? The rack holds up to five magazines close to the wall so no one will bump into it. Me likey. In case you want to build your own for the bathroom librarian in your life, I'll include the dimensions below. I built this one as a Christmas gift to my husband but couldn't wait a few more days to install it.


Slim magazine rack cut list:

(2) 1x3 8 1/2"
(3) 1x3 9"
(1) 1x2 9"

Note: You could also increase its depth by using 1x4s instead of 1x3s or change the style in front by swapping out the 1x3 for another 9" 1x2. If you look at the second picture, you'll see that between the horizontal strips of wood on the front, there's a 9" piece on the back to screw the rack onto the wall.

17 December 2010

Another farmhouse bed

While they were doing this, 


 I was building this.


Of course, William thought it was for him...


But, it wasn't quite his size.


I painted it white during his nap time and, under the direction of my daughter's aesthetic, sewed some pillows and a quilt for its future occupant. Can you believe this beautiful doll bed was made with 100% scraps and I didn't have to buy a single thing to make it? I love Ana's plans.


Want to see more? You can here.

15 December 2010

Recitals

This month Savannah had her first piano recital with her new teacher. She played Beethoven's Ode to Joy, the simplified version to which her piano teacher accompanied her, and Candy Shop.  She is such a patient girl, never afraid of performing in front of an audience and waiting quietly when it's someone else's turn.

Savannah waits her turn to play her recital pieces.
For her recital I made her a new dress, an early Christmas present from Mommy. It's a long jumper-style dress in purple corduroy, very rich and warm with tights.

Yay! Savannah plays the first three lines of Ode to Joy solo without a hitch.
After the performance there was just enough time for a few poses in front of the poinsettias.


And of course, even William got to have his own little recital at home. It may not have been musical in nature, but he was the center of attention after stealing his Dearest's glasses, which is better than stealing her beer...


Happy William before his ear infection. The next day he grumped around for a day before we realized he had another ear infection. Now that he's been treated, he's his rascally happy self again. Whew!

04 December 2010

Cooking with William

Ever wonder what life is really like at our house? Have you ever tried to do something with your hands tied behind your back? Then you have some idea of what it's like to cook with William.

William opens my container drawer and makes room for himself. Perfect for Mommy to trip over on the way to get utensils.
It's a priority for us to have home cooked meals that don't start in a box or package. So, I spend a lot of time in the kitchen. It's one of my domains.

William likes to open my oven warming drawer, usually with great force on my toes, presumably so he can get warm.
The kids like to be where I am, so naturally, they also spend time in the kitchen. But in different ways.


William likes to open everything he can get his hands on. Everything. In the time it takes me to saute an onion, he has had the time to go through every drawer in my kitchen. He picks up my heavy cast iron cookware and transports it to new locations. Wouldn't you know it, All-Clad likes to travel in this manner too. With all the frequent toddler miles they've earned, they'll be on vacation in Hawaii by the end of December, first class.


He opens drawers, slides them out, rearranges items and then leaves them out so that when I'm carrying a large pot of pasta in boiling water to the sink, I get the added challenge of maneuvering though an obstacle course while trying not to parboil myself. It's great fun, really. I'm sure all the medieval cooks used to spice up life in the castle kitchen to see which ones deserved culinary knighthood.


What weapons can I reach in here?
Then there's the baking tool drawer and the cooking utensil drawer. They contain lead-free baby safe items like vegetable peelers, Henckels knife sets, microplanes (Did you know these were actually woodworking and metalworking tools before some brave woman stole one from her hubby to use as a zester in the kitchen?), pizza cutters, you get the picture.

None of them work as well as when Mommy does it...
Here's my kitchen floor, after William is done digging in my drawers. See that rolling pin? You would think it's pretty dangerous, like a rolling log or slippery banana peel but the item of top concern is actually the dough docker. Definitely one of the most lethal tools I own, similar to a spiked medieval morning star, awaiting its next victim when it's on the floor. The next time you come visit and stay for a meal at my house, you are welcome to challenge yourself in my kitchen. Not feeling that brave? That's okay because now when you sit down at our dining room table for a meal, you will really enjoy it knowing how many obstacles I had to overcome, how many battles I had to win, how many sharp objects I had to face, just to prepare a seemingly simple dish for you.

30 November 2010

Gratitude

November is a month of gratitude for me for a number of reasons, so I am always sad to see it go. For four years now I have participated in Nanowrimo, National Novel Writing Month, and each year that I pull a novel out of thin air (working on it only after my work is done and the children are in bed), I'm surprised and thankful. Thankful because I'm doing something I love and have a carrot and stick to make me do it.


November is also the month that we spend more time indoors together. There's less to do outdoors. The garden doesn't need tending anymore and has been tilled back into itself to feed itself for another year. The fruits have been mulched and fed with a rich layer of compost and the chickens are quieter now and appreciate our company more and food scraps with fewer grubs and bugs to eat.

Lucky, our handsome one-eyed rooster.

November is the month that comfort foods start appearing on the dinner table; warm and creamy squash dishes, vegetable casseroles, roasted chickens, hearty potatoes and root vegetables, soups, and sweet apple crisps and warm puddings. We begin to open the jars of jams we set aside in summer, blueberry jam from our neighbors' blueberries, strawberry from the orchard down the road, cranberry grape jam for turkey and chicken dinners. A homemade pie crust can be filled with anything in November; a savory quiche, a pumpkin pie, a chicken vegetable stew, sweet potatoes, cinnamon apples with crumble topping, or vegetables and cheese.


The wood stove cranks out enough heat to keep two stories of our house very warm and suddenly we're wearing T-shirts again. With the shorter days, we spend more time at home inside the house as a family, tickling, giggling, talking, snuggling, reading books, and rascaling (that's an actual word in our vocabulary).

Savannah reads William his favorite book, Each Peach Pear Plum, on the sofa in pajammies (another Sara word) before bedtime.
We also prepare for the Christmas holiday by beginning our annual decluttering. We pick up our stuff and ask it when we last used it, whether it makes our lives easier or more beautiful, whether it or the space it occupies is more important to us. Space that can be used for practicing Taekwondo, for dancing to the Backyardigans theme song for the 10,000th time, for entertaining guests, now that we're indoors so much, or for chasing, or tickling, or driving toy cars around.

William making art at the easel.

November is a great time to begin star gazing again. My favorite constellations are prominent in the early night sky and Venus always shines brightly. There are meteor showers and they start early enough that the kids can see them before bedtime, just in time to wish on a star. Yes, November is among my favorite months, so I am always sad to see it go, but grateful that we experienced all it had to offer.

12 November 2010

Paper whites

Late fall and early winter days can feel drab after the bright colors of early autumn and the end of harvest abundance. One way I like to counteract is with a burst of spring in the house by forcing bulbs. This year we are using paper whites in two rounds. One for early November, one for Thanksgiving.

Bulbs planted in river pebbles and water the last week of October.

They are fragrant like lilies, almost too sweet if you are sensitive to smells like I am, but they are easy to keep and grow quickly.

Each flower grows in a cluster of 10-12 white flowers and each bulb has 2 to 4 flower clusters of its own.
 Overall, very satisfying effect for such a quick indoor gardening project in the middle of the drab days between fall and winter, brown and white.

31 October 2010

Blood suckers

Both of my children were blood suckers for Halloween this year, one very scary vampira


and one itty bitty spider (with a binky!)


Savannah filled her bag halfway this year. With Daddy out of the country, and Mommy on her own, we did an abbreviated form of trick-or-treating this year. William was quite the wild spider, running all over our neighbor's houses (playing with their calculators, climbing their chairs, harassing their dogs, opening their kitchen drawers, the usual boy stuff just in other people's houses) after he ate some M&Ms. Fortunately, he doesn't know how to open candy so he just tries to bite into the shiny wrappers, which doesn't yield any sugar. Mommy can't wait for Daddy to take over the trick-or-treating again next year.

Happy Halloween!

28 October 2010

Play time

For my birthday I wanted to get something special for the kids. I opted for this:

 I really like it! It's strong enough to hold 1,200 pounds, so Kev and I can climb on the geometric dome too and with a 10 foot diameter, there's more than enough room for all of us.


 Little William has to be especially creative while playing since he can't climb it yet himself. He has fun trying though. He runs under and through the dome and swings by his arms from the lower bars like a monkey.


It's a challenge for Savannah who is learning more agility and balance. The first day she fell from the top right on her back but we had piled 8-10 inches of mulch beneath it, so it was like falling on a soft bed. Fortunately, she hasn't fallen since and everyday that it hasn't rained, we've run outside to climb.

17 October 2010

Office bookshelf

I'm embarrassed to say that since we've moved into this house, our office area has been a mess. This is partly because we moved from a house with a 16' x 12' office with a 12' built-in floor to ceiling bookcase, full closet, and his and hers desks and filing cabinets. Now we share a small desk in a tiny space that is shaped like a triangle and not an equilateral or isosceles triangle, but an irregular scalene one. For an extra challenge with two "real walls" and the third open to the stair banister. But enough of the excuses, here's a before and after photo of the mess.


We painted the office walls a while back when my mother was visiting. Paint is always the first requirement for renovating a room here. The desk is against the top landing, with the printer adjacent to it, the window wall has one small bookcase holding a jumble of supplies and there are boxes of files, paper and other electronics stacked against the long wall - in short a disorganized mess! I had the idea a while back that a single long bookcase could solve the problem. My husband was a disbeliever. Over a two-week period I had the chance to sneak out to the garage during nap times to start building this thing. Because of my lumber diet (our beater of a farm truck didn't pass inspection and I don't have another way of transporting lumber at the moment), I had to use what was available to me. I had a piece of 3/4" thick plywood in the barn that I'd only cut the corner off of to make my potting bench. So I got to work with my early Mother's Day gift and built this.

Here's the new bookcase built from plywood and framed in pine 1"x 2"s.
I generally followed the plans from Ana White's website, Knockoff Wood for Grace's bookshelf. My shelf is sized for the space though and the materials I had on hand so the dimensions are about 60" wide by 32" tall. The cubes on the bottom are 15" x 15" x 13" deep.

Here it is all filled up with office supplies and ah- organized.
Because of the small space of the office, even with my widest angle lens, I couldn't fit the whole shelf and wall organizers in the photo. Above the wall is a file organizer on the left, a cork board in the center and a white board on the right. And yes, that is an outlet in the middle of the wall six feet high. The whole office has oddly placed outlets like that one.


Here's the window wall with the new curtains I sewed to match those on the stairwells. Perhaps you'll notice two more oddly placed outlets to the right of the window. At least the view from the window is great.


I'm very excited about having an organized space again with all of my files at my finger tips. Really I have to thank Ana White for showing me how easy it is to build solutions to all my problems. Thanks Ana!

11 October 2010

Garlic planting

It's time to plant garlic. This year for my zone, October 12th was announced as the perfect day for planting cloves. Alas, I am not a perfectionist so I had to plant mine on the 10th when my husband was home to help keep the kids at the raspberry patch while I dug in the compost pile. Why the exact timing? So there is enough time to let the roots settle and grow but not for the shoots to break the soil surface before the first frost.

Filled with compost with room for a mulch layer. My raised beds are about 2' deep by 6' long. Plans for raised bed can be found here on Ana White's site.

I am planting garlic in the first raised bed I built. (When I can acquire more lumber, I plan to build at least four more raised beds, most to be filled with food, but my daughter will have her own for whatever strikes her fancy. My beds are 2' by 6', using 4 2x6s. This way, all the lumber you purchase is used.) I used a rake and hoe to loosen the soil beneath this bed, then dragged it into place. I placed 3 inches of composted hay in the bottom of this planter, then 6 inches of compost, which compacted the hay. Within a week I plan to stake two corners of the raised bed, but I haven't had the time to cut the stakes yet.

My garlic cloves should remain toasty enough this winter under their blanket of pine needles.
I planted 17 garlic cloves evenly spaced in the raised bed about 7" apart. I'm trying a California softneck variety this year. I pushed each clove 1 inch below the soil surface then sprinkled an additional generous inch of compost on top.  Because garlic is a spring crop that overwinters, it likes a good coat of mulch. Leaf mulches are the most popular for garlic but we don't have a system for mulching leaves. One popular method of making a leaf mulch is to fill a rubber trash can with raked leaves and then insert your weed whacker (like an immersion blender) and give them a good chopping. One day I plan to do that, but for now I simply raked some of the needles from our big white pine and mulched with a generous 4 inches. I know that pine needles are acidic but my organic gardening books tout it as an excellent mulch for most things because it breaks down so slowly. The waxy coating on the needles helps the soil beneath it retain moisture while the needles themselves do not absorb much moisture. They do a great job of keeping down weeds and I happen to like the look of them. Pine needles make a good blanket for winter crops like garlic so I'm testing this all out and keeping my fingers crossed for some delicious spring garlic.

Uh, oh! Didn't count on the appeal for local wildlife to climb in! Better add a layer of chicken wire across the top.
As long as I can keep critters out of my raised beds I hope for some delicious home grown spring garlic. I hope to count 17 sets of scapes curling out of their winter dormancy come May or June. I use garlic scapes in soups, potatoes and omelets. I place them in a vase to enjoy their wild green beauty and pluck them out at will. My children prefer the quick access because they like to nibble on them. My favorite website for garlic planting information in cooler zones is Boundary Garlic Farm.

Garlic scapes in a Ball jar awaiting their fate.

01 October 2010

Stacked

For two weekends we've been stacking wood in the barn. Kevin splits the wood from trees that have fallen in bad weather or from age and then stacks them behind the barn to dry for a year. This year he's helped two other people remove large trees from their yards for next year's wood. I know that I do a lot of things many women wouldn't do but one thing I don't touch is the chainsaw. That is completely my husband's forte. I get to do the lion's share of wood stacking though.

Here it is stacked inside the barn, three rows deep stacked six feet high. The long rows are about 20 feet long and the short row is about 16 feet long.

When stacking wood I always discover the critters whose lives are intertwined with it. There are snake skins, from those who enjoy the protective coolness of the wood pile and perhaps enjoy rubbing against the rough bark. There are wasps who build their paper nests like Japanese lanterns, colorful fungi, and sometimes, near the bottom of the pile, there are bright orange newts crawling in the damp grass and soil. Today I discovered a nest of mice, one mother and her five babies, all nursing with their eyes closed.

Mother mouse peeks out at me.
My instinct is not to disturb any creature, especially one nursing its babies. But, they are mice and there's little room for sympathy on a farm. Mice get into the barn and burrow their way into the tractor's motor, dragging insulation and other nesting materials with them. They eat through the wiring. They chew through the boxes we store in our garage leaving holes in our things and their droppings behind, and they carry Lyme disease. Kevin scolded me for not killing them and I see his perspective, but I find myself asking whether a pink wriggly baby that hasn't yet opened its eyes to the world is a worthy opponent. It only craves the warmth and milk of its mother.

Two of the babies with eyes shut.
Once upon a time I worked in a laboratory where it was my job to breed a mutant strain of mouse, and to sometimes cull the babies the day they were born for tissue cultures, which I also performed. I used dry ice so the death was painless, and the purpose of my work was to learn more about muscular dystrophy treatments, but still, it's never escaped me that all those lives were in my hands.

Today though, I couldn't do it. I'll let Kevin make his own decision about the nest but my mothering instincts are too strong to destroy this home.

28 September 2010

New bench

For a while I've wanted an outdoor bench or a pair of outdoor benches that we could use near the pond to throw our towels on and just sit and watch the sun set over the water's edge or drag over to the bonfire area so we can sit comfortably while watching the tendrils of orange and yellow dance. And don't forget the marshmallows!


Kevin put me on a lumber diet, that is he refused to go to the store to purchase the lumber I wanted to build a pair of benches, so I decided to rummage through the scrap pile of lumber in the barn to see what I could find. I ended up building this on the fly and am really pleased with it. After some light sanding, my mom stained the bench with two coats to match the deck. The stain also protects the wood from the outdoors and hides the fact that I've used three different types of wood to build it. I'm glad this bench turned out the way it did, sometimes having a handicap or challenge makes you find creative ways to solve a problem.

Bench in use for our first bonfire of the year.

But now that our farm truck hasn't passed inspection, I won't be able to make trips to the lumber store for a whole year (that's how long we plan to try to keep the truck around to plow the driveway, but the truck may have plans of its own). Anyway, next time you visit, maybe you can join us for an evening bonfire on a starry night.

Savannah is the patient marshmallow roaster, waiting for the coals and turning her stick evenly.


Come share some smores with us!

22 September 2010

Greenhouse cleanup

As my summer garden is winding down and my fall crops are busy growing without any help from me, I've been fantasizing about a winter garden. We have a very odd greenhouse that is attached to our home. It is triangular in shape and the point faces south. It is what gardeners call a cold greenhouse because it is not heated throughout the winter so the temperature can fall fairly close to freezing. I've used it to start seeds but haven't kept much growing in it since spring.

View of one side of the greenhouse from the garden. Each side has four sliding glass doors except for the one inside the house (the hypotenuse), which has five.

My greenhouse has been a mess lately so today I spent some time cleaning it up and decided that I wanted to build a table for the corner. Fortunately, I had a piece of plywood in the barn, one last 2x4 and some scrap 1x3 from Savannah's piano bench. During William's nap time, I came up with this:

My wild sweet basil plants started from seed but never transplanted in the garden.
It turned out well enough since it fits two planting flats across it with room on one side for my watering can and room on the other for my plant food, seeds, and wooden labels.

Two planting tray flats deep, one with my seedling herbs, the other with my huge basil plants.
I'm trying to grow some more herbs and winter plants in the greenhouse this year so we'll see how it turns out. I like the idea of tending to green things all year but the truth is that during especially busy weeks I often lapse on my end of the commitment (ahem, watering).

My simple little corner table setup. I wanted something that wouldn't obstruct the view of our garden, woods, or fields. There's plenty of room beneath for two of my 30" trays for lettuces as well.

Savannah is growing some of her own chives by seed and chocolate mint transplanted from a neighbor's garden, so hopefully she'll help me keep up with it when I'm having a hard week. William also loves to dig his little fingers in the soil of my pots and walk around with the watering can pretending to water them. He also helps me pick the leaves off the basil and oregano to add them to my marinara sauce, which he likes to eat.

The start of a great marinara - tomatoes, onions, zucchini, squash, basil and oregano from our garden and garlic and carrots from our CSA.
I hope we can keep the greenhouse going for as long as possible this winter. Plants bring me so much peace and contentment.