Showing posts with label Building stuff. Show all posts

22 November 2011

New nautical room

My daughter has long been obsessed with pirates and all things nautical. Even though she begged me three years ago to let her have a pink room (only a month after I'd painted it yellow), she spent the better part of the last six months begging me for a blue room. Pink and blue are the two colors I don't like on walls or in houses. I'm partial to warm neutrals. Alas, what's a pirate's mother to do in the end. We now have a blue room in our house.


New laminated nautical world map, blue striped duvet, and shark sheets. Arrgh!
Rope hung shelves to display all things nautical and trophies plundered and earned for feats of bravery.

Desk made by Captain's mum for arts and crafts and plotting ship's course.

Ship's wheel clock for steering young pirates to activities on time.

Book cases made by pirate's mum to hold treasure maps and booty and such.

Look! Space for more booty!

Savannah still has her treasure chest at the foot of her bed, filled with the egg money she saves and other personal treasures. We are only awaiting a low-pile chenille rug on back order to complete the project. I can say with great accuracy that this pirate's mum is looking forward to relaxing for the holidays now that the captain's quarters are in tip-top ship-shape.

04 September 2011

Busy bee me

I know it seems like I let a time slip by without posting much. Summers are challenging because they are so busy. One of my projects has been renovating the guest/project room. It is a small bedroom and I needed a project room much more than we needed a guest bedroom so even though it took me two years to do it,  I finally sold our super-comfy queen size bed that didn't fit in the room no matter how you tried to arrange it. And then I built two more to fit into the space (yes two more!)


This is the XL Full daybed I built with a Full-size trundle beneath it - two beds in a smaller space. I already love how the smaller beds have transformed the space in the room. I also made the drapes and pillows (after all this room is also my project room!)


The dresser is an antique yellow pine one that I fell in love with at an antique show in Boston and have had ever since. I wouldn't dream of painting it antique white to "match". I like the Bohemian look to this room.


Kevin helped by finally replacing the closet doors in this room. They had to be removed during the radiant floor-retrofitting, but that was two years ago... The quilt on my design board is the most recent one I've completed.


On the other side of the room is my somewhat organized, always in use, sewing space. I built this desk as a Christmas present to myself last December but it's been in use from the day the paint dried so I've never taken a photo of it. I custom-built it 2" lower than average so it suits my height perfectly (no more stretching my toes down like a child to reach the sewing machine pedal!)


I've tried to make the most of the space by adding shelving to store fat quarters, peg board to keep my sewing tools within reach and a fabric covered design bulletin board for my lists and ideas.


On the corner wall I painted a pair of thread-holding racks and mounted them to keep my thread with reach as well. The sewing desk is large enough to accommodate both my serger and my regular sewing machine at the same time and for large projects, I can pull the table away from the wall to let the fabric drape over the other side as I'm sewing. Forms follows function is the motto of this room.

01 September 2011

Laundry renovation

When we first moved into this house, the laundry was in the basement, crowded in the mechanical room where we needed to put a whole house water filter and mini-furnace for the radiant floor. So we moved the washer and dryer upstairs, to a hallway in the master suite area. After the move, I really wanted to put cabinets up but there was a window, our only window for that area nearly flush with the wall and cabinets would have blocked half of it. I finally settled on open air shelving.


I'm glad I finally finished this project. I had cabinet-grade plywood ripped to 15.5" strips for wide shelves and painted them to match the trim in the room. The baskets on top (one is missing) hold little used items like candles and light bulbs (with the new energy-efficient bulbs, it seems we never have to change a bulb!) And the basket on bottom holds the things we use for doing laundry like stain removing mineral spirits, etc. Now it's easy to clean off the tops of the washer and dryer and they don't collect trinkets like rocks and acorns and coins from people's pockets.


I am still considering add a small ruffle curtain beneath the bottom shelf to hide the outlets but at the moment I kind of like the cold, utilitarianness of it. (Did I mention laundry is not my favorite chore?)

Utiliarianism, in architecture:
  1. The belief that the value of a feature is determined by its utility.
  2. The aesthetic of exposing necessary materials and features, such as metal or heating pipes, which are normally included in a design for their utility rather than their aesthetic appeal.

01 July 2011

Bathroom display wall

You might be wondering why you haven't heard from me in so long. It's not for lack of news. We thought would have to move in July for Kevin's work so I've been working like a mad person to complete all the unfinished home renovation projects on our house. Of course, Kevin was "transferred" to a new position in the same town so we get to stay for another year - yay!


I've been working hard to renovate the master bathroom, which has a large wall space that is not easily accessible. To me that screams display. Using Ana White's simple plans for ten dollar display shelves, I created a pair for the wall and painted them the same color as the vanity, which I've remodeled and the wrap-around built-in bench in the master bathroom. It's such a simple project, but I think they look great without cluttering the space too much. I wanted a subtle beach or shell-themed room since we take an annual vacation to the Gulf Coast of Florida and really love it. The only pictures on the wall are of us at the beach and shells that we've collected or purchased while in Hawaii or Florida. There's still plenty of blank space left to fill as we make new memories, although we've thought of adding a corked bottle with a secret message inside. I can't wait until the entire master bathroom is complete and I can show you the whole thing.

17 April 2011

Simple stair bookshelf


We have particularly wide stairs with nice wide landings. I think they are perfect for more bookshelves, since it seems no matter how many books I donate to the library, we always need room for more.


Using a 1 x 12 pine board, I constructed this small bookshelf. It is very solid, even though I didn't use wood glue in addition to screws this time. I intended to back it, but like it so much plain, I'm going to live with it for a while before I decide whether or not to tack on a back. It's only 18" tall but it keeps with the openness of this contemporary house. I primed it and painted it with two coats of a muted sage green sample paint I had in my paint closet - one of the rejects for the upstairs bathroom. My intention for this book case was for it to hold reference books that everyone in the family uses, to get them out of the office and to place them closer to where we use them. The basket holds my Mother Earth News magazines, which I read once cover to cover, then consult over and over again.


I used the top to display some of Kevin's Air Force honors and USATF awards, which had been collecting dust in a corner, and our wedding ducks. In some Asian cultures, wedding ducks are given as a symbol of life long commitment, as ducks mate for life. They believe the spirit of the carver enters the ducks, which impart the carver's good fortunes on the married couple. The ducks symbolize peace, inseparableness, and many children. I sometimes forget they are supposed to be placed bill to bill, not tail to tail, which is a sign of a tiff.

This is the first time I primed my wood before painting it and I can't believe the difference - the paint went on so quickly and smoothly there's not a brush stroke on this piece. It looks much more professional than some of my other pieces. I guess I finally learned something.

12 April 2011

Spring chores

It seems that as soon as the ground thaws, there's a long list of chores needing attention around here. Fortunately, with good weather over the weekend, I could get some odd jobs done outside while the kids played ball, chased the chickens, and climbed trees. I was able to build two of the three raised cedar beds I wanted for the garden this year. We are trying out some new gardening techniques with the crops we've had difficulty with in the past years - mainly because of critters eating them. Mine are constructed from 1 x 4 cedar lumber in 8 foot lengths because it's cheapest to build them with these materials and because 8 ft is the maximum length I can fit in the car. These beds are 2 x 6 feet and 11" high so they are easily portable. I used a cedar 2 x 4 for the corner supports.


Of course, right after building these, I discovered another design that I fell in love with. The main difference is simply that this raised bed plan anticipates critter problems so it includes covering the bottom with hardware cloth to prevent moles from digging through the bottom and uses PVC tubing to create hoops to drape bird cloth over the top keeping out birds and many insects as well. You could alternate using bird cloth with frost cloth to extend the growing season as well. In the above photo, you can see I've installed the PVC piping in one of the raised beds already. Unfortunately, I had to learn the hard way that you can't bend 1/2" PVC tubing across a 2-foot span - it's simply not flexible enough. So, I will be using traditional metal hoops for the cedar beds that fit inside the PVC instead.


I decided to adapt this hoop method to the strawberry fountain, which our chickens and the crows like to get into once the strawberries appear. I can't wait to fill the new raised beds with soil and compost and get started but we're not yet past our last frost date. At the moment I have the greenhouse filled with baby seedlings waiting to be transplanted. With the hoops over the tops of the new raised beds, I'm considering trying to keep them covered with frost cloth to protect them from frost and transplanting early, we'll see how brave I get. (The greenhouse is also filled with fluffy baby Buff Orpington chicks!)


After all the rain from last week, the ground was perfectly soft and soggy for digging holes for planting new blueberry bushes and raspberries this weekend. I set one new blueberry plant in digging a much larger hole and layering soil, straw, and chicken manure compost in the bottom of it. I always separate the root bundle and splay it out to help encourage the roots to grow deeper. I also planted three Heritage raspberry plants to expand our patch and replace some of the canes that didn't make it from last year. One of my favorite things about summer is taking the children to the garden to have their snack. They love picking the fresh raspberries, blackberries, strawberries, and blueberries for themselves. They pop cherry tomatoes in their mouths like candies and wonder why tomatoes from the store don't taste like these. They eat all the sugar snap peas so that they never make it to the house. This year, I'm expanding our sugar snap pea patch by four fold so some will surely make it to the house, I hope.

11 March 2011

Farmer genius

There's a certain kind of genius that only experienced farmers possess. That genius has come from years of making mistakes, back-breaking work, and age; age that makes you work smarter because your body can no longer work harder.

After doing much research on chicken waterers, I discovered a chicken farmer who makes his own waterers and feeders for about 10 bucks each. They keep the water clean and full for about two weeks for a flock our size. So, I couldn't resist, I had to make my own because anything that makes my life easier, is a blessing.


First I tipped my 5-gallon bucket upside down in the pan to mark the height of the side of the pan on the bucket. Then I turned it back over to drill 3/8" holes below this line (when turned over).  I filled it up, tapped on the lid,  and turned it over set outdoors for a few hours to be certain there was no leaking before introducing it to the coop. The girls are thrilled with their new watering system! Placed on a cinder block, they can't kick up their bedding into the water.


The feed bucket has 1 1/4" holes drilled around the base of the bucket (again below the side of the pan). I also drilled three 1/4" holes in the bucket and using screws, washers and nuts, bolted them together so it wouldn't tip or get pushed to the side. As the girls eat, their feed refills itself. I only wish I had done this sooner!

01 February 2011

Treadmill desk

There's a slow trend in offices across America, both corporate and home offices, towards increasing exercise during the work day. As a mother with a very stubborn eight pounds of baby fat to lose, naturally, I had to jump on this bandwagon. So, I built myself a treadmill desk.


It's very simple and fits around my treadmill, but didn't cost me the $500-$6,000 that some companies are charging for these. It is made from 2x3s for the legs, a pair of 2x2 cross supports, and some leftover 3/4" MDF for the desk top. I used my Kreg Jig to attached the legs and painted it black to help it blend in as much as possible with the existing treadmill.

Check out my new office view!
The idea is that you walk 1-2 miles per hour while working on your computer. It's exercise that you wouldn't get otherwise and adds up over time. I'm really looking forward to using my new work station. The other freelancers I know who use one say it has increased their productivity while decreasing their butt size.


Search for "treadmill desk" and you'll find a wealth of information on the topic and the studies that have been conducted so far. To build your own, just keep in mind that it should clear your treadmill on all sides, rather than rest on the treadmill to avoid any vibration from the machine. Hope you build one this year too!

30 January 2011

Worm houses

Last night I read about a farming family and one of the many things they do to promote soil health is vermicomposting. I've considered getting worms many times before but kept putting it off until my littlest rascal is older. Today though, something clicked and I ordered my worms and we constructed our worm houses. As is often the case, it turned out to be a family affair.


Savannah learned how to use an electric drill with the impressive 1/2" drill bit. We drilled holes on the bottoms of two 12 gallon containers for aeration and drainage of any excess water. Excess water will be caught in a second container below, that is intact.


Ever wonder what happens to all those manuscripts I write and work on? If they are lucky enough to get printed, they end up shredded and in the spring get added to my compost pile. Kind of neat that my work feeds my garden too.


The paper will act as bedding for the red wigglers, a tiny but voracious worm, that will occupy their new digs when they arrive on Tuesday. The paper is kept moist for them and a bit of organic soil and food scraps are added daily.


My help gets a little exuberant with the worm bedding! At least there's an indoor gardening project we can do in the dead of winter that's fun.

I think William is pretty proud of his indoor farming project!

Here's one of the double set of bins (we made two sets of worm houses); the whole bin sits on the bottom, the bin with the 1/2" holes drilled into the bottom sits on top of it. There are also holes at the top for air circulation right beneath the lid. Eventually, we will place a third bin with holes drilled in it over this one for two weeks when it's time to use the worm castings. The worms crawl up through the holes in the bottom of the floor to the new food available in the top bin. Our worm houses were constructed with information from this website and our 2,000 red wiggler worms were ordered on sale here, a Pennsylvania company.

We made two sets of wiggler homes, and plan to house about a thousand in each. The first vericomposter is affectionately named the "Vermestate" and the second is the "Wormcome Inn". We're not the only ones who named their worm houses, right? Bring on the castings! I can't wait to use them in the garden.


22 December 2010

Bathroom library

I saw a cartoon that reminds me very much of my house. In the comic, a woman is giving her friend a tour of the house and as she stops in front of the bathroom she gestures towards it politely and says, "And this is my husband's library."

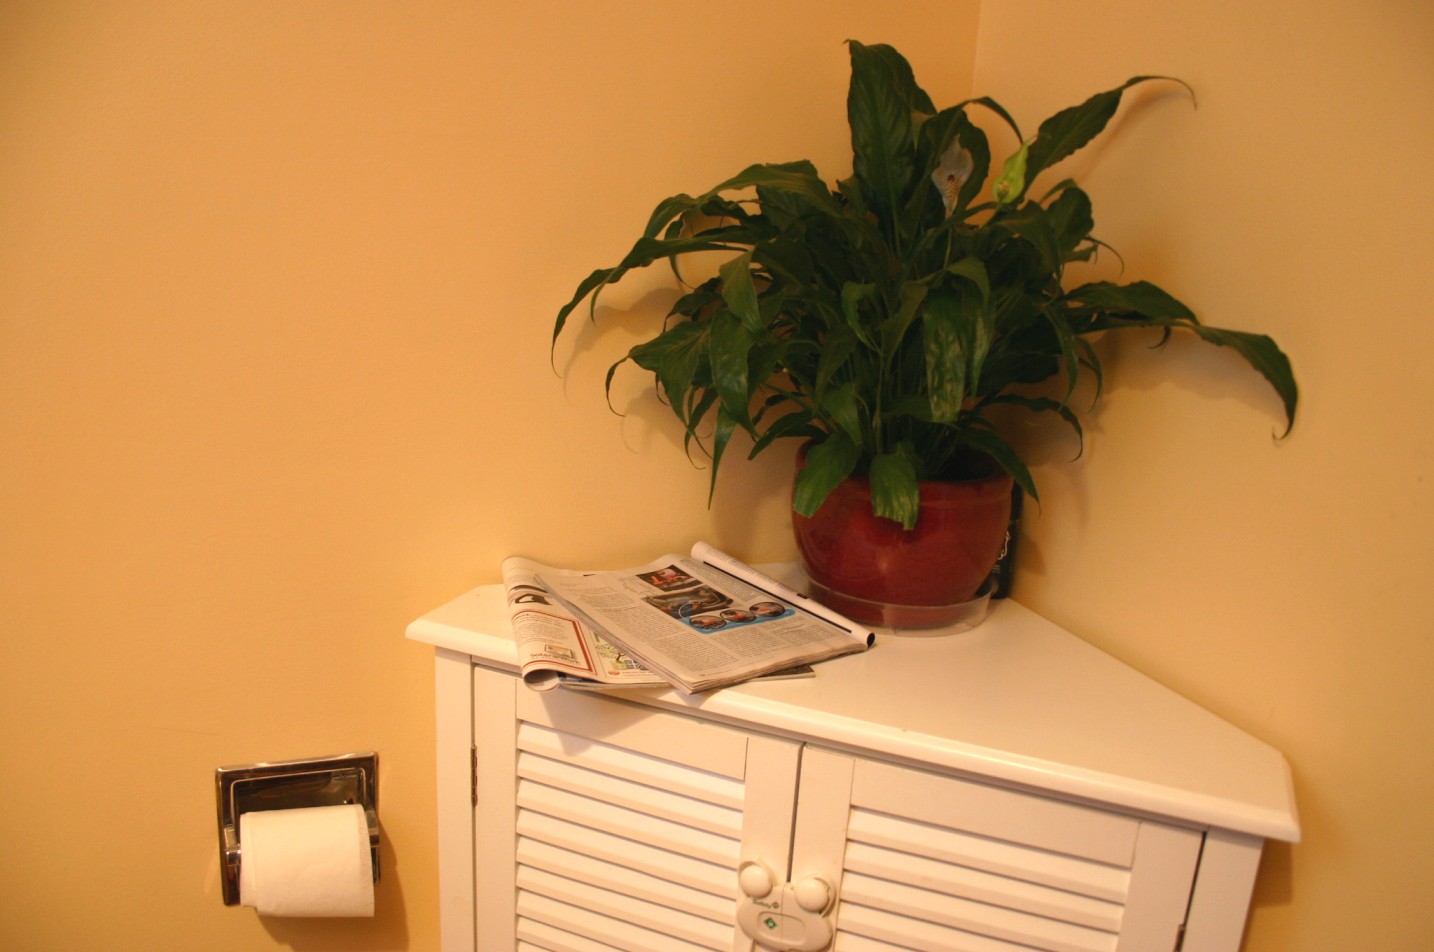
A pile of magazines starts to grow faster than the house plant in the first floor bathroom.

That's how my DH treats our bathrooms and I have to admit, I can understand it. When you have young children, there's pretty much only one room in the entire house where you can truly get some peace and that's the library, aka, bathroom. But, of the three bathrooms in this house, two of them are small and there's no room for a regular magazine rack. This means that I have to pick up piles of Solar Today and Popular Mechanics to clean the bathrooms or shuffle them aside to get to the things that really belong in a bathroom. So I came up with a solution I can live with.

The solution.
I know, you're probably thinking, what's that. It's my solution so the bathroom reader and the bathroom cleaner can coexist peacefully together in the same space. I'll let it speak for itself.


Ta-da! The most elegant solutions are usually the most simple. I transformed some scrap wood into a magazine wall rack. By painting it the same color as the wall (called Sugar cookie by Behr), I hoped to make it blend in as much as possible. I didn't want to clutter an already small bathroom.


What do you think? The rack holds up to five magazines close to the wall so no one will bump into it. Me likey. In case you want to build your own for the bathroom librarian in your life, I'll include the dimensions below. I built this one as a Christmas gift to my husband but couldn't wait a few more days to install it.


Slim magazine rack cut list:

(2) 1x3 8 1/2"
(3) 1x3 9"
(1) 1x2 9"

Note: You could also increase its depth by using 1x4s instead of 1x3s or change the style in front by swapping out the 1x3 for another 9" 1x2. If you look at the second picture, you'll see that between the horizontal strips of wood on the front, there's a 9" piece on the back to screw the rack onto the wall.

17 December 2010

Another farmhouse bed

While they were doing this, 


 I was building this.


Of course, William thought it was for him...


But, it wasn't quite his size.


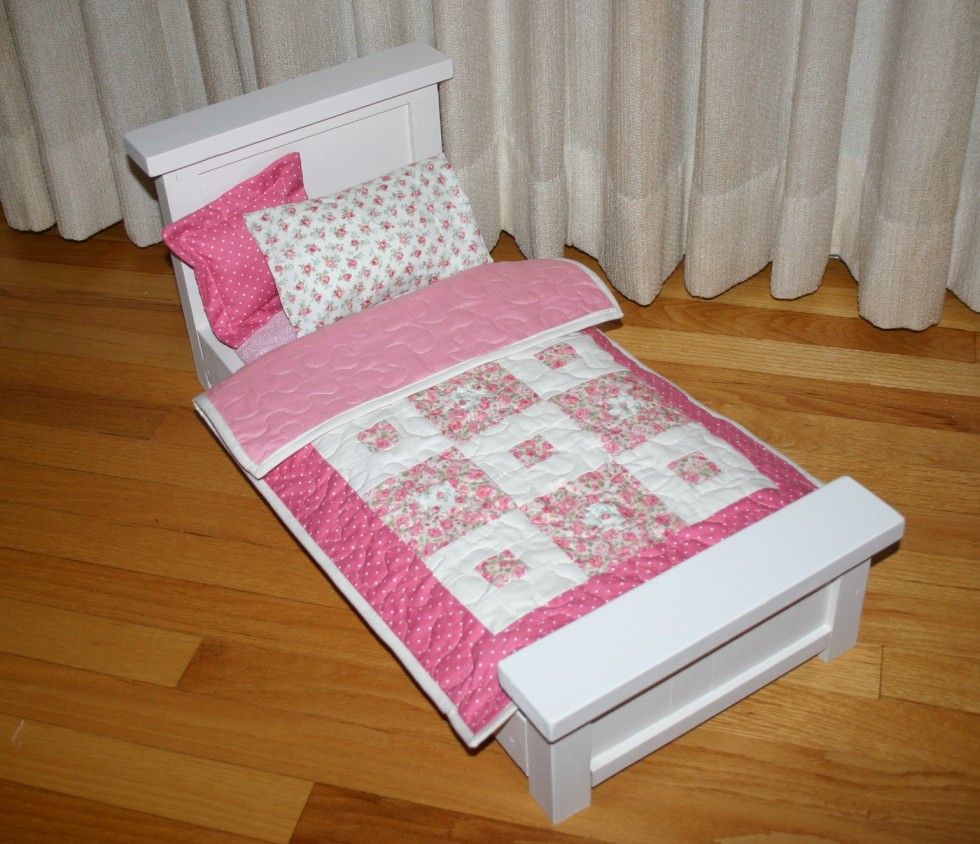
I painted it white during his nap time and, under the direction of my daughter's aesthetic, sewed some pillows and a quilt for its future occupant. Can you believe this beautiful doll bed was made with 100% scraps and I didn't have to buy a single thing to make it? I love Ana's plans.


Want to see more? You can here.

17 October 2010

Office bookshelf

I'm embarrassed to say that since we've moved into this house, our office area has been a mess. This is partly because we moved from a house with a 16' x 12' office with a 12' built-in floor to ceiling bookcase, full closet, and his and hers desks and filing cabinets. Now we share a small desk in a tiny space that is shaped like a triangle and not an equilateral or isosceles triangle, but an irregular scalene one. For an extra challenge with two "real walls" and the third open to the stair banister. But enough of the excuses, here's a before and after photo of the mess.


We painted the office walls a while back when my mother was visiting. Paint is always the first requirement for renovating a room here. The desk is against the top landing, with the printer adjacent to it, the window wall has one small bookcase holding a jumble of supplies and there are boxes of files, paper and other electronics stacked against the long wall - in short a disorganized mess! I had the idea a while back that a single long bookcase could solve the problem. My husband was a disbeliever. Over a two-week period I had the chance to sneak out to the garage during nap times to start building this thing. Because of my lumber diet (our beater of a farm truck didn't pass inspection and I don't have another way of transporting lumber at the moment), I had to use what was available to me. I had a piece of 3/4" thick plywood in the barn that I'd only cut the corner off of to make my potting bench. So I got to work with my early Mother's Day gift and built this.

Here's the new bookcase built from plywood and framed in pine 1"x 2"s.
I generally followed the plans from Ana White's website, Knockoff Wood for Grace's bookshelf. My shelf is sized for the space though and the materials I had on hand so the dimensions are about 60" wide by 32" tall. The cubes on the bottom are 15" x 15" x 13" deep.

Here it is all filled up with office supplies and ah- organized.
Because of the small space of the office, even with my widest angle lens, I couldn't fit the whole shelf and wall organizers in the photo. Above the wall is a file organizer on the left, a cork board in the center and a white board on the right. And yes, that is an outlet in the middle of the wall six feet high. The whole office has oddly placed outlets like that one.


Here's the window wall with the new curtains I sewed to match those on the stairwells. Perhaps you'll notice two more oddly placed outlets to the right of the window. At least the view from the window is great.


I'm very excited about having an organized space again with all of my files at my finger tips. Really I have to thank Ana White for showing me how easy it is to build solutions to all my problems. Thanks Ana!

11 October 2010

Garlic planting

It's time to plant garlic. This year for my zone, October 12th was announced as the perfect day for planting cloves. Alas, I am not a perfectionist so I had to plant mine on the 10th when my husband was home to help keep the kids at the raspberry patch while I dug in the compost pile. Why the exact timing? So there is enough time to let the roots settle and grow but not for the shoots to break the soil surface before the first frost.

Filled with compost with room for a mulch layer. My raised beds are about 2' deep by 6' long. Plans for raised bed can be found here on Ana White's site.

I am planting garlic in the first raised bed I built. (When I can acquire more lumber, I plan to build at least four more raised beds, most to be filled with food, but my daughter will have her own for whatever strikes her fancy. My beds are 2' by 6', using 4 2x6s. This way, all the lumber you purchase is used.) I used a rake and hoe to loosen the soil beneath this bed, then dragged it into place. I placed 3 inches of composted hay in the bottom of this planter, then 6 inches of compost, which compacted the hay. Within a week I plan to stake two corners of the raised bed, but I haven't had the time to cut the stakes yet.

My garlic cloves should remain toasty enough this winter under their blanket of pine needles.
I planted 17 garlic cloves evenly spaced in the raised bed about 7" apart. I'm trying a California softneck variety this year. I pushed each clove 1 inch below the soil surface then sprinkled an additional generous inch of compost on top.  Because garlic is a spring crop that overwinters, it likes a good coat of mulch. Leaf mulches are the most popular for garlic but we don't have a system for mulching leaves. One popular method of making a leaf mulch is to fill a rubber trash can with raked leaves and then insert your weed whacker (like an immersion blender) and give them a good chopping. One day I plan to do that, but for now I simply raked some of the needles from our big white pine and mulched with a generous 4 inches. I know that pine needles are acidic but my organic gardening books tout it as an excellent mulch for most things because it breaks down so slowly. The waxy coating on the needles helps the soil beneath it retain moisture while the needles themselves do not absorb much moisture. They do a great job of keeping down weeds and I happen to like the look of them. Pine needles make a good blanket for winter crops like garlic so I'm testing this all out and keeping my fingers crossed for some delicious spring garlic.

Uh, oh! Didn't count on the appeal for local wildlife to climb in! Better add a layer of chicken wire across the top.
As long as I can keep critters out of my raised beds I hope for some delicious home grown spring garlic. I hope to count 17 sets of scapes curling out of their winter dormancy come May or June. I use garlic scapes in soups, potatoes and omelets. I place them in a vase to enjoy their wild green beauty and pluck them out at will. My children prefer the quick access because they like to nibble on them. My favorite website for garlic planting information in cooler zones is Boundary Garlic Farm.

Garlic scapes in a Ball jar awaiting their fate.